New Pokemon Snap Every Illumina Spot Request & How To Complete Them
New Pokemon Snap: Every Illumina Spot Request & How To Complete Them
Contents
Each of the six Illumina Spots in New Pokemon Snap has its own LenTalk photo request and many of these will guide players towards four star photos.
You Are Reading :[thien_display_title]

Each of the islands in New Pokemon Snap has its very own Illumina Spot and it’s here that players will encounter the game’s six Illumina Pokemon. To complete the courses, all players will need to do is photograph the Illumina Pokemon while they are glowing, although each of the Illumina Spots also has its own LenTalk photo request which will usually help players to figure out how to take a four star photo of the Pokemon for their New Pokemon Snap Photodex. Not all of them do, although the photo opportunities that these outlying requests provide are arguably just as unique.
Players will only start to receive these requests after first visiting their respective Illumina Spots, at which point they will have already reached research level 2. Returning to the course thereafter will result in some other Pokemon being present and these new additions will often play a part in the setup for the photographs that are being requested. None of the requests are all that difficult to complete, although figuring out exactly what’s required to do so can sometimes be a little tricky.
Meganium’s Pal Request Guide

Players will need to visit the Florio Island Illumina Spot at least once to receive the Meganium’s Pal request. After they do, they should return to the course and make their way towards the pink tree on the left near the end of the course. Once close enough, players can throw a Fluffruit into the branches on the far side of the tree to make a Hoothoot fall out and land on the ground. If the Meganium is close enough at the time, it will sit down beside the Hoothoot for a moment allowing players to snap a photo of the Meganium with its pal to complete Rita’s request. Unfortunately, however, the Meganium doesn’t always pass close enough to the tree to get the photo that players need, although it’s possible to manipulate the route that it takes so that it does with the help of a few Illumina Orbs.
Players will need to avoid throwing Illumina Orbs at the Meganium for the first part of the course, but will need to make sure that the second Crystabloom is illuminated as the Meganium approaches. This will cause it to bend down and sniff the nearby flowers and, when it does so, players should pelt it with Illumina Orbs so that it rears up onto its hind legs. As well as providing players with a four star photo opportunity, this will also ensure that the Meganium runs around the left side of the pink tree later on, meaning that players will just need to make sure to knock the Hoothoot down at the right time to fulfill the request’s requirements.
Milotic’s Mighty Leap Request Guide

After their first visit to the Belusylva Island Illumina Spot, players will receive the Milotic’s Mighty Leap request from Phil. It’s a fairly simple one to complete, although does require players to act quickly at one particular point during the run. To get to this point, players should make their way through the course as they usually would, hitting the Milotic with Fluffruit to make it surface and then following that up with an Illumina Orb so that it starts to glow.
Shortly after the Milotic heads over towards land to speak with the Trevanant or the Ninetails, it will dive back under the water and players should again hit it with a Fluffruit and Illumina Orb combo so that it regains its glow. After it does, it will leap into the air, at which point players will need to hit it with another Illumina Orb as quickly as possible. They’ll only have a second or two to make the shot and so it might take a few runs to perfect. Assuming that players make the shot while the Milotic is still in the air though, the Pokemon will leap higher still which will create a much larger twister. From here, players will just need to hand in a four star photo of this moment to the Professor at the end of their run to fulfill Phil’s request.
Swirling Energy Request Guide

The Swirling Energy Request can be completed at the Maricopia Island Illumina Spot from research level 2 onward. To do so, players will need to get a shot of the school form Wishiwashi whipping up an underwater vortex, which it will do in the area with the two Crystablooms about half way through the course if the right conditions are met. Players will know when they’re in the right area as they will begin to see Finneon mixed in with the small groups of solo form Wishiwashi. If they see any Luvdisc then they have gone too far and should restart their run and try again.
Just as they would in a normal run, players should set about hitting as many of the solo form Wishiwashi with Illumina Orbs as they can until they swim away and return in their school form. Once this happens, players should start throwing Illumina Orbs at the giant Wishiwashi until it begins to glow pink and green. If they’re quick enough, the Pokemon will begin to swim around in circles which will whip up the water and create the vortex needed for the request. Both it and the Wishiwashi will need to be in the photo that’s handed in to the Professor, which should also be classed as a four star shot.
Vocal Volcarona Request Guide

Upon their arrival at the Voluca Island Illumina Spot, players will be greeted by two angry Volcarona. Before they can photograph them, however, they’ll first need to hit them with Fluffruit to remove their flame shields and then land an Illumina Orb or two so that they begin to glow. The two Pokemon will regain their flame shields at various points throughout the run, so players will need to repeat these steps every time that they do.
For the Vocal Volcarona request, players should wait until they are about half way up in the second chamber and then illuminate one of the Crystablooms to attract the Volcarona. This will only work if their flame shields are down and they are glowing though and players will need both of them near the Crystabloom to get the photo that they require. A second or two after the pair get in position, they’ll begin to communicate with each other which will cause white and blue beams of light to pass between them. The Professor wants a four star photo of this happening and so players will need to snap one quickly before they fly away again. It’s worth taking a few shots here just in case one or two of them are of the Crystabloom rather than the Pokemon themselves.
Steelix Takes a Breather Request Guide

The Steelix Takes a Breather request can be completed at the Durice Island Illumina Spot and requires players to get a one star photo of Steelix sleeping. To do this, they’ll need to hit the three Noibat at the start of the course with Illumina Orbs and then continue on as they usually would. It’s important, however, that they avoid throwing Fluffruit into any of the small holes in the first area or illuminating any of the course’s Crystabloom as this will summon Crobat and make it impossible to get the shot required.
Assuming that no Crobat show up, Steelix will appear in the final area of the course and curl up into a ball. Players will have about ten seconds to get a photo of it snoozing and will then need to hand it in to the Professor at the end of the run to complete Rita’s request. If players want a four star photo of Steelix, they’ll instead need to wake the Crobat in the first area by throwing a Fluffruit into the small hole to the right of the one that Steelix first comes out of and then hitting the nearby Noibat with an Illumina orb so that it uses Supersonic. If done correctly, Steelix will leap up and chew off a piece of a stalactite in the final area rather than sleep, although this will prevent players from completing the request.
The Power of Xerneas Request Guide
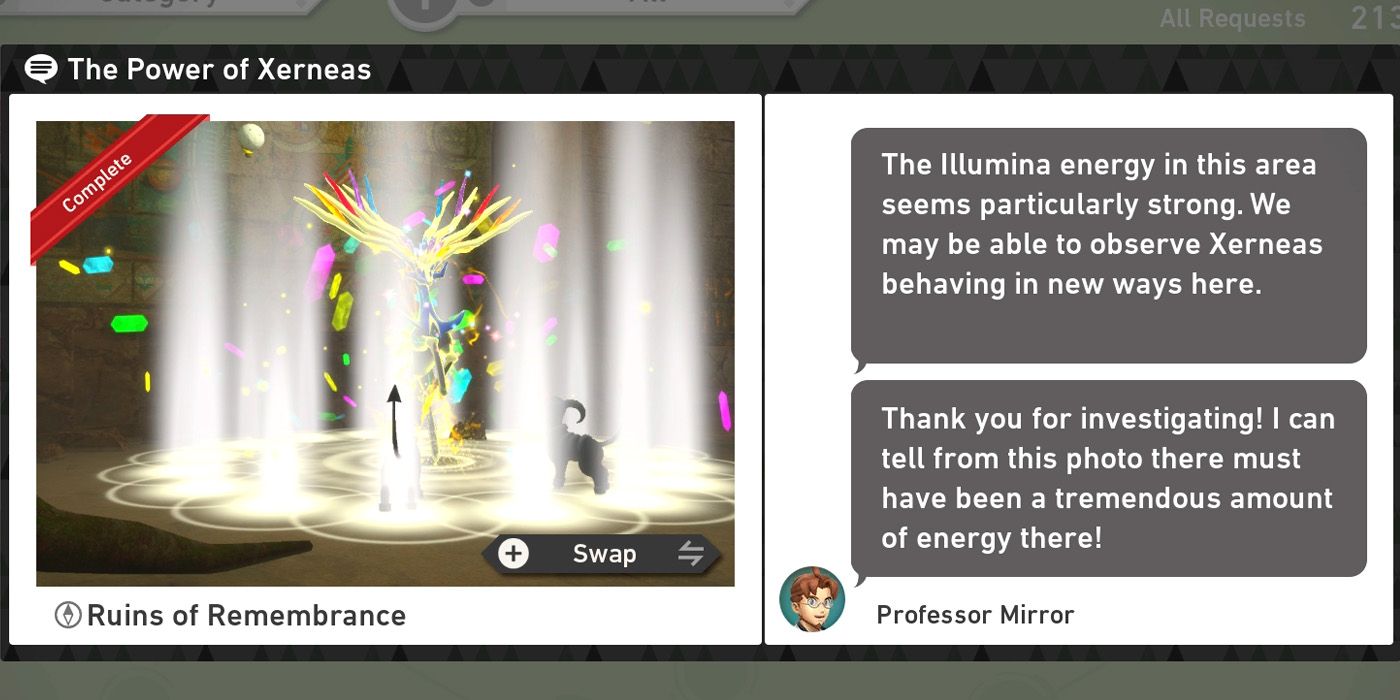
Players will receive the The Power of Xerneas request after their first visit to the Aurus Island Illumina Spot and will need to get a photo of Xerneas using Geomancy to complete it. To do this, players should follow the glowing ball into the area with the water and then hit it with an Illumina Orb so that the Xerneas returns to its physical form. Once it does, hitting it with another Illumina Orb will cause it to start glowing and it will then make its way over to a spot near the ruins and stand in wait.
At this point, players will need to wake the two Houndoom by hitting them with a Fluffruit followed immediately by an Illumina Orb. After they’re awake, they’ll take their places to the left and right of the Xerneas and players can hit the Legendary Pokemon with another Illumina Orb to make it use Geomancy. Players will have two or three seconds to take the four star photo needed to complete the Professor’s request and can also grab a four star photo of one of the Houndoom howling at the same time if they’re fast enough.
#new-pokemon-snap-how-to-complete-every-illumina-spot-request/” target=”_blank” rel=”noopener”>#new-pokemon-snap-how-to-complete-every-illumina-spot-request/
Pokemon -Pokemon GO April Community Day 2021 Wish List
Pokemon Sun and Moon Gameplay and Details Showcased
Pokemon Sword and Shield Grookey and Sobbles Final Evolutions Leaked
Pokemon Unite Tier List (January 2022)
Pokemon Sword and Shield Zacian Zamazenta and Eternatus Explained
Pokemon FireType Starter Chinese Zodiac Theory Explained
GR Pick Sir David Attenborough Narrating Pokemon GO
